|
|
Last Updated: |
|
|
Last Updated: |
Workaround : Copying Patch Names
Across Different
Devices/XML
|
WARNING: |
|
PROBLEM : |
|
Workaround: |
|
Below it's an example / procedure of how this could be done. |
|
2006/01 |
![]()
|
Q U I C K J U M P |
|
|
Top
| Introduction |
Preparations |
Install Device |
Create New Device
| |
BACK TO DEVICE PANEL HELP PAGE | BACK TO DEVICE PANEL MAIN PAGE
![]()
|
There are a couple of things. Since at present, the Midi Device Manager cannot Export individual device, so you need to clear everything in the Midi Device Manager before starting to do anything. |
|
This can be done by either pressing the Remove Device Button in Midi Device Manager, removing each of your existing devices one by one or by renaming the Midi Devices.bin file. |
|
In any case, you should 1st
backup your setup. |
|
Then either, remove each existing device by pressing the Remove Device button or... |
|
Quit Cubase SX, then goto
your %APPDATA% folder, i.e., your User Applications Folder, usually
located at: |
|
Go into the Steinberg\Cubase SX3\ directory. |
|
Or you can click ''Cubase SX3 Application Data Folder'' shortcut in the Start Menu, under the Cubase SX Shortcut folder. |
|
Here, you'll see a file called "Midi
Devices.bin". Rename this file (to something like "Midi
Devices.bin.bak"). |
|
Now open Midi Device Manager and there should be no device listed. |
![]()
|
Q U I C K J U M P |
|
|
Top
| Introduction |
Preparations |
Install Device |
Create New Device
| |
BACK TO DEVICE PANEL HELP PAGE | BACK TO DEVICE PANEL MAIN PAGE
![]()
| First we need to make a device XML file, installing from patch name scripts. | |
|
|
You should already have your patch name script .txt file
placed/copied to the "Scripts\Patchnames\inactive" folder, inside
your Cubase SX3 Application Data
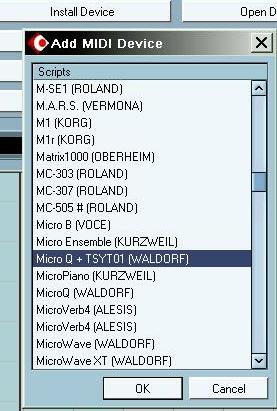
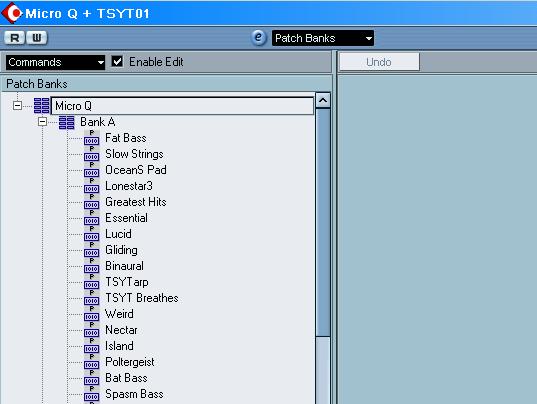
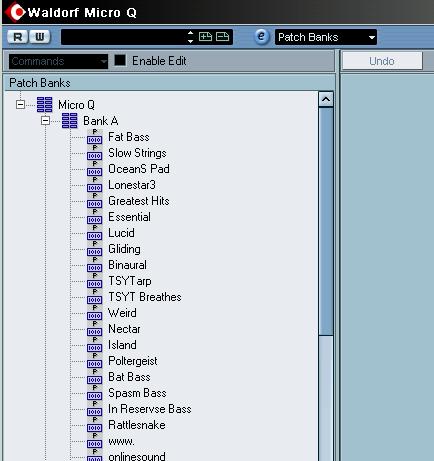
Folder. Open Midi Device Manager, click on the Install Device button, this will bring up the Add MIDI Device list. Select the device you want here. In this example, I'll use the Waldorf Micro Q (altho I don't own one). Click OK and the device will be created, importing all the banks, patches, and patch names information.
Then near the blue 'e' button at the top, on the drop down, select 'Patch Banks' This will take you to the Patch Banks editor page. |
|
Note down what you have here. |
|
|
|
|
|
Next, close the editor, and then EXPORT the device by pressing the Export Device button in the Midi Device Manager. |
|
![]()
|
Q U I C K J U M P |
|
|
Top
| Introduction |
Preparations |
Install Device |
Create New Device
| |
BACK TO DEVICE PANEL HELP PAGE | BACK TO DEVICE PANEL MAIN PAGE
![]()
|
Next we need to create out new device. |
|
|
|
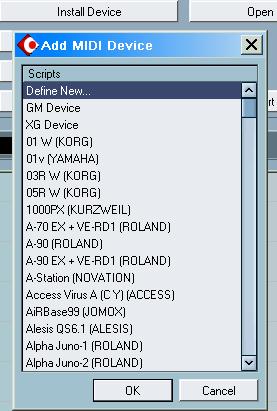
Open Midi Device Manager, click on the Install Device
button, this will bring up the Add MIDI Device list. This time, select "Define New...". Click OK. You'll then be brought to the very important "Create New MIDI Device" pane. |
|
|
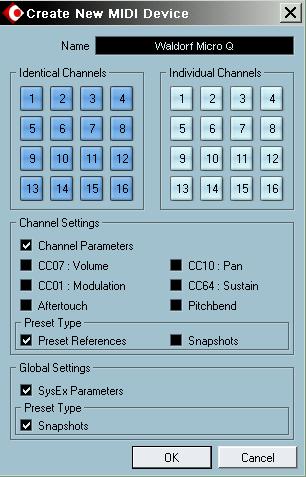
Enter the name of the device.
MAKE SURE YOU USE A DIFFERENT NAME to the previous one.
You can always rename it after everything is done. Now this is the important part: Under "Channel Settings", check Channel parameters. Preset Type, check Preset References. Global Settings, check SysEx Parameters. Preset Types, check Snapshots. (Well, basically, follow the image!!) |
|
Clicking on OK will bring you to the Device page. Again we need to go to the Patch Banks page. |
|
|
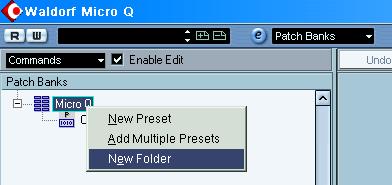
In the Patch Banks editor, it should default to an Empty Bank, no sub folders, no presets. Click the Enable Edit Button. Rename the 'Empty Bank' to the same name as the other
device. |
|
|
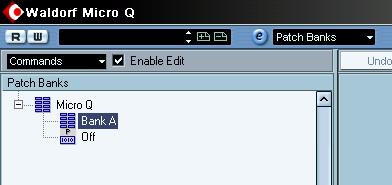
Since in this particular example, the previous device has 3 sub-folder banks, for convenient sake, I usually add a similar structure (but just one sub folder instead of 3). Either using the Commands drop down or right-click on the root bank and select New Folder. Rename this to the same as in the previous device. |
|
|
|
|
|
Next, close the editor, and then EXPORT the device by pressing the Export Device button in the Midi Device Manager. |
|
|
Now you should have 2 XML files. One with all the Patch Names but no identical channel settings, one with proper settings but no patchnames defined. |
|
![]()
|
Q U I C K J U M P |
|
|
Top
| Introduction |
Preparations |
Install Device |
Create New Device
| |
BACK TO DEVICE PANEL HELP PAGE | BACK TO DEVICE PANEL MAIN PAGE
![]()
|
XML EDITING - Part 1 - Copying Patch Names |
|
Open the XML with a text editor. |
|
We need to first copy all the patch banks / names from one XML to another. To do that you need to highlight (in the 1st XML), from
where it says <list name="Banks" type="Obj"> |
|
|
|
We need to copy from here, right down to just before the last ''Off'' preset that Cubase created by default. This could be further down, maybe a thousand lines below, or some 4000 lines below. Use the Search/Find function to locate "Off". |
|
|
|
Highlight from <list name="Banks" type="Obj">
|
|
|
|
Do a Ctrl-C / COPY. |
|
Then open the new device XML. Locate, again, the first <list name="Banks" type="Obj"> |
|
|
|
You can see, since we created that Bank A, but no
presets, the <list name="Presets" ... value="Off"/> is immediately below
that Bank A value. |
|
|
|
Then do a Ctrl-V / PASTE and paste in the stuff that we copied from the other XML file. |
![]()
|
Q U I C K J U M P |
|
|
Top
| Introduction |
Preparations |
Install Device |
Create New Device
| |
BACK TO DEVICE PANEL HELP PAGE | BACK TO DEVICE PANEL MAIN PAGE
![]()
|
XML EDITING - Part 2 - Copying Channel Parameters |
|
I'm not sure if this is needed or not. |
|
However I found that in the other XML (that we imported the patchname script), there are the lines: <list
name="Banks" type="Obj"> where "xxxxxxxxx" is the unique ID. These 3 lines are not present in the new script, under the channel chunk, the lines are only right at the end (with a different ID). So we need to copy this, and paste this chunk under each midi channel 2 - 15. |
|
First, look at the XML with imported patch
names, a little bit after the value="Off", you'll see value="channel 2". |
|
|
|
Highlight and copy this. |
|
Then, we need to paste this to the new XML. Again a bit under value="channel 2", I usually do this just before the </obj> tag. |
|
|
|
Paste the lines here. |
|
|
|
Now REPEAT this paste for the next midi channel, until you're done with channel 16. |
|
|
|
A little further down, you'll find these same 3 lines, BUT with a different Unique ID. |
|
|
|
This is because, we've been copying from the other script, that uses another ID, so we need to replace this ID with the other ID as well: |
|
|
| Notice in this case, we replaced the ID from from 258564328 to 258862280. |
![]()
|
Q U I C K J U M P |
|
|
Top
| Introduction |
Preparations |
Install Device |
Create New Device
| |
BACK TO DEVICE PANEL HELP PAGE | BACK TO DEVICE PANEL MAIN PAGE
![]()
|
XML EDITING - Part 3 - Copying the Midi Prog Change Commands |
|
In the new script, after the last bit we've just replaced, the script has reached the end. |
|
However, in the other script, there's a whole chunk of
stuff after this. Starting at: |
|
|
|
This chunk of stuff are the actual midi program change (and/or bank change) commands that Cubase would send out when it's selected. So again we need this whole chunk copied and paste into our new XML. |
|
|
|
So highlight and copy, and then goto the new XML... |
|
|
|
...and paste them in. |
|
|
|
Save the new XML. Hopefully, we're done. |
![]()
|
Q U I C K J U M P |
|
|
Top
| Introduction |
Preparations |
Install Device |
Create New Device
| |
BACK TO DEVICE PANEL HELP PAGE | BACK TO DEVICE PANEL MAIN PAGE
![]()
|
CHECKING / Final Thoughts |
|
After all that's done (whew!), you can now import the new XML into Midi Device Manager. |
|
NOTE: |
|
Well, good news is this example XML imported perfectly into Midi Device Manager. |
|
A quick check - open the device, goto the Patch Banks page and see for yourself - all the banks and patches copied over. |
|
|
|
Now you can start building a panel with this, and the device is set to have identical channels. |
|
NOTE: |
|
1. If your new XML imported OK, but the Patch Bank is empty, it means, part(s) of the copying have mistakes. In this case you have to re-check or simply re-do the copying and see if you get it right next time or not (!) |
| 2. If the XML imported OK, but Patch Bank
only contains sub-folders but not patches, it means, probably, you've
copied all the patch names / banks correctly BUT, there're errors/mistakes
in the Program Change commands part.
In this case, re-check the lower part of the XML. (See XML Editing 3). |
|
3. If the XML imported OK, there are some Banks/Sub-Folders and Patches, BUT one or two sub-folders has no patches. In this case, it's usually that you've missed one of the
Unique ID or the |
| Well, this is not a very good workaround.
But it does work. I guess, if the original script has many items, like multiple banks, complicated program changes / bank changes, then you're likely to run into more problems. So far I have only encountered one or two complex scripts that can't be copied this way. Most other scripts worked. At least it's easier than retyping every single patch names by hand! |
| Well, until Steinberg gives us proper copying / import / merge... |
![]()
|
Q U I C K J U M P |
|
|
Top
| Introduction |
Preparations |
Install Device |
Create New Device
| |
BACK TO DEVICE PANEL HELP PAGE | BACK TO DEVICE PANEL MAIN PAGE
![]()
![]()
![]()
![]()
![]()
![]()
![]()